
How to Never Miss a Lead Again (even when you’re with a client)
You’re in the middle of a shoot, heads down with a client, or finally sitting down for dinner. Your phone buzzes. New inquiry. By the time you get back to it, they’ve already reached out to three other people and booked someone who responded first.
This isn’t a worst-case scenario. It’s a Tuesday.
Research shows that responding within 5 minutes makes you 21x more likely to book that client compared to waiting just 30 minutes. And 78% of people hire the first business that responds.
The issue isn’t that you’re careless or unprofessional. It’s that you’re busy doing the work. You can’t reply to every inquiry the second it comes in. And you shouldn’t have to.
So what if your contact form could respond for you? Within seconds. Branded. Personal. Every single time.
That’s what this guide is about. Whether you use Dubsado or not, the strategy is the same. And if you do use Dubsado, I’ll walk you through exactly how to build it step by step.
What your lead should experience (and probably isn’t)
Before we get into any setup, let’s talk about what this actually looks like from your potential client’s perspective. Because that’s the part that matters.
Here’s the experience you’re building:
They find your website and fill out your contact form. Maybe it’s 9pm on a Wednesday. Maybe it’s during their lunch break. Doesn’t matter.
Within seconds, they get a warm email from you. It’s branded. It has your name on it. It might include a welcome message, a link to your services and pricing, your portfolio or Instagram, a scheduler to book a call, or a quick video intro. Whatever makes sense for your business.
They feel taken care of. They’re not wondering if their form submission went through. They’re not refreshing their inbox. They already feel like they’re in good hands.
Meanwhile, you haven’t even seen the notification yet. You’re still at your shoot, your meeting, or your kid’s soccer game. Your system handled it.
That’s the goal. Your lead gets a great first impression. You get to stay present in whatever you’re doing. Everyone wins.
And here’s the part most people worry about: no, your leads won’t know it’s automated. The email comes from your email address, with your branding, in your voice. You write the content. Your system just sends it at the right time. To your client, it feels like you personally responded in seconds.
What to include in your automated response
The best automated lead responses aren’t just a “thanks for reaching out” email. They do real work. Think about what your lead needs in order to take the next step with you, and put that in the response.
Depending on your business, that might include:
A welcome message that sounds like you, not like a template
A link to your services and pricing so they can self-qualify before a call
A scheduler link so they can book a discovery call without any back-and-forth
A portfolio, case study, or Instagram link so they can see your work while they’re still interested
A quick video intro if you want to make a personal connection before you’ve even met
A proposal or pricing sheet for businesses where that makes sense as a first touchpoint
The principle is simple: give them everything they need to stay excited and take the next step. Don’t make them wait for a second email that may or may not come before they’ve moved on.
The strategy (regardless of what tools you use)
Whether you’re using Dubsado, another CRM, or piecing things together with a form builder and email tool, the automation logic is the same:
Your contact form collects the inquiry. Name, email, what they’re interested in. The basics.
The form submission triggers an automatic response. This is the email your lead gets within seconds of hitting submit.
If you offer multiple services, the response is tailored. A wedding photographer sends different info than a brand photographer. A web designer sends different info than someone who does VIP days. If your form asks what they’re interested in, your response can match.
The lead is saved somewhere you can follow up. Whether that’s a CRM, a spreadsheet, or an inbox folder, you need to be able to find them later and continue the conversation.
That’s the foundation. The difference between tools is how much of this you can automate in one place vs. how much you’re stitching together across multiple platforms.
How to build this in Dubsado
If you’re already using Dubsado, this section walks you through exactly how to set it up. If you’re not, this is a good preview of what’s possible when your lead capture, email templates, and workflows all live in the same system.
A few quick definitions
If you’re new to Dubsado or new to automating your business, here’s a quick rundown of the terms you’ll see below:
Lead capture form: A contact form you embed on your website or share via link. When someone submits it, Dubsado automatically saves their details as a new project in your account. Think of it as your digital front door.
Workflow: An automated series of steps that runs after something happens (like a form submission). A workflow can send emails, deliver forms, schedule appointments, create tasks, and more. You set it up once, and it runs every time a new lead comes in.
Project: Every client engagement lives inside a project. When a lead fills out your form, a project is created for them automatically. That’s where all their details, emails, contracts, invoices, and forms live in one place.
Smart fields: Placeholders in your emails and forms that automatically fill in with your client’s info (like their name or project date). One email template feels personal for every single client.
Before you start
A little prep goes a long way. Before you connect a workflow to your lead capture form, make sure you have these pieces in place:
Build your lead capture form first. Your lead capture form is how new client info gets saved into Dubsado as a project. Without the form, there’s nothing for the workflow to trigger from. If you haven’t created one yet, start there.
Map out your process. Before automating anything, think through what should happen after someone fills out your form. Do you want to send a welcome email? A pricing guide? A link to book a discovery call? Knowing your steps upfront saves you from building something that doesn’t match how you actually work. Even jotting it down on paper helps.
Test before you go live. If your workflow has errors, your leads could get the wrong email, the wrong form, or nothing at all. Run a test with a dummy submission before connecting it to a live form. Every time.
Two ways to connect a workflow to your form
Which method you choose depends on how many services you offer and whether each one needs a different response.
Option 1: Default workflow
Use this when you want every new lead to get the same response. Maybe that’s a welcome email with a link to your services page, a PDF pricing guide, and a scheduler so they can book a call. Everyone gets the same great first impression.
How to set it up:
Go to Templates » Forms and open your lead capture form.
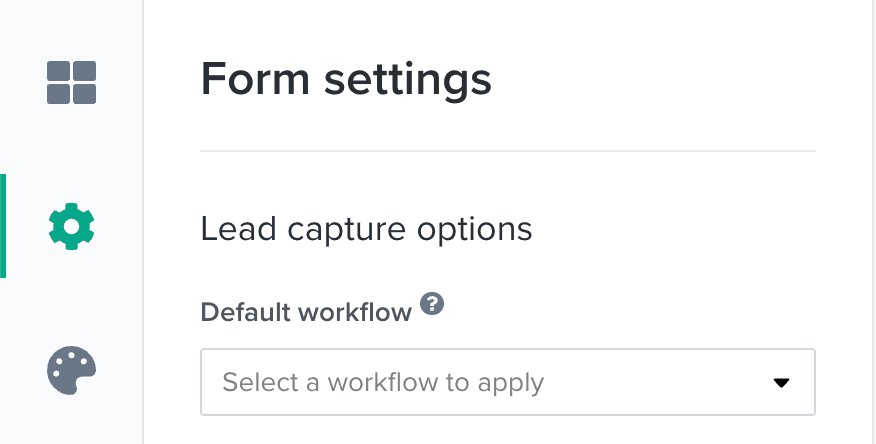
Click on Form settings (the gear icon on the left side).
Under Default workflow, choose the workflow you want to run when this form is submitted.
Click Save form.
That’s it. Every time someone fills out that form, your workflow kicks in automatically.
Option 2: Workflow form element
This is where it gets good. The workflow form element adds a dropdown to your contact form so leads can choose their service type. Each option triggers a completely different workflow.
Someone who selects “wedding photography” gets a welcome email with your wedding portfolio, pricing, and timeline info. Someone who selects “brand sessions” gets a totally different email with brand-specific samples and your brand session guide. It feels personal because you built it to be personal. You just built it once.
How to set it up:
Go to Templates » Forms and open your lead capture form.
Drag or click Workflow to add it as a form element.
Click the newly added element to edit it.
Under Options, assign a workflow to each dropdown choice.
Turn on Required so leads can’t skip this step.
Click Save form.
Note: Smart fields can’t be mapped to the workflow dropdown. Only short answer and date select fields support smart field mapping on forms.
Common questions
Can the lead capture form run both a default workflow and a workflow form element at the same time?
No. If you’ve set up both, the client’s selection in the workflow form element takes priority. The default workflow won’t run. Pick one method per form.
Can I trigger two workflows from one form submission?
No. Each lead capture form can only trigger one workflow per submission. If you need multiple automations to happen, build those steps into a single workflow. You’d be surprised how much you can fit into one.
Do I need a Dubsado account to set this up?
The automation strategy works with any tool that connects a contact form to an email response. If you want to use Dubsado specifically, you can start with a free trial and get full access to forms, workflows, and automations so you can build and test before committing.
Will my leads know this is automated?
Not unless you tell them. The email comes from your email address, with your branding, in your voice. You write the content. Dubsado just sends it at the right time. To your client, it feels like you personally responded within seconds. That’s the whole point.
The bottom line
Connecting an automated response to your contact form is one of the most impactful things you can set up for your business. And it takes about 15 minutes.
Every single person who reaches out to you gets a warm, professional, on-brand response within seconds. Not because you’re glued to your inbox. Because you built a system that shows up even when your schedule doesn’t allow you to.
Your leads don’t need you to be available 24/7. They need to feel like they’re in good hands. That confidence is what turns an inquiry into a client. And it starts the moment they hit submit.
Build it once. Let it run. And watch how differently your leads show up when they feel taken care of from the start.
For related strategies, you may also want to explore guides like The 10 Minute Window That Can Win or Lose a Client, Questions to Ask on Your Lead Capture Form and How to Map Your Client Journey on the Dubsado blog.
Start with a workflow that's already built. The Lead Flow Quick Start comes pre-loaded in your free 21-day Dubsado trial - lead capture form, automated response, and follow-up flow included and ready for you to customize.